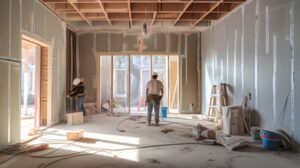
Drywall Repair Mesa AZ is the process of patching and smoothing out damage to drywall. This can be caused by various events, including dents and holes, cracks, and water damage.
Oftentimes, these cracks indicate an issue with the structure or leakage. It is important to call a professional rather than trying to fix it yourself.
If you’re planning on tackling your drywall repair yourself, it is important to assess the damage first. This will help you determine the proper repair technique and gather the necessary materials. It is also essential to prioritize safety throughout the process. Wear protective gear, including eye protection and a dust mask, to avoid breathing in harmful irritants. Move furniture and other items away from the wall, and cover any nearby surfaces with plastic or drop cloths to prevent dust and debris from settling on them. Make sure to turn off the power to any outlets or light switches in the area as well.
Examine the size and type of the hole, as well as any cracks or other signs of wear, to determine whether a simple touch-up will suffice or if more extensive repairs are needed. If you’re unsure of the extent of the damage, or if it involves areas that are difficult to access, consider hiring professional handyman services to ensure quality workmanship and safe operation of your home’s structures.
It’s also important to keep in mind that regular maintenance is the best way to protect against drywall damage. Taking steps like keeping humidity levels in check, installing anchors for heavy items, and regularly inspecting your walls for damage will help you identify and address issues before they become serious problems. In addition, regular drywall repair and maintenance will reduce your risk of experiencing damage due to general wear and tear. If you’re looking for professional assistance with assessing and addressing drywall damage, consult the expert technicians at Sierra View. We can provide tailored drywall repair advice and services for any home improvement project.
Gather the Materials
Drywall Repair is a relatively simple do-it-yourself project that can be completed by almost anyone with the right tools. The materials are affordable and easy to find, making this a great first DIY project for new homeowners or renters.
Drywall, also known as plasterboard or gypsum board, is a common construction material that’s comprised of a gypsum core sandwiched between two layers of paper. It’s used to create walls and ceilings, and it’s a common sight in homes, apartments, and office buildings. It’s available in different grades and styles to meet specific building requirements, such as moisture-resistant drywall (sometimes called green board) that’s ideal for bathrooms and kitchens.
To fix a small hole in drywall, the most basic tools you’ll need include a putty knife, sandpaper or fine-grit steel wool, and joint compound (also known as spackle). Some kits come with all of these items, but for larger holes you’ll also need a drywall patch and a roll of furring strips. You should also consider purchasing a set of drywall knives in various sizes for more efficient work, and sanding sponges for smoothing out rough patches once they’re dry.
When choosing a drywall patch, it’s important to find one that’s the same size as the damaged area. This will ensure that the new patch blends in seamlessly with the existing wall and won’t be noticeable. Finally, it’s a good idea to select a setting compound that dries quickly, as this will allow you to finish the job faster. If you’re unsure of what size to purchase, ask the sales staff at your local home improvement store for help. They’ll be able to provide you with a recommendation based on the size of your hole.
Prepare the Surface
For drywall repairs of all sizes, proper surface preparation is essential to ensure flawless results. This includes ensuring the repaired area blends seamlessly with existing wall surfaces and preparing the surface for painting. It also helps prevent future damage from occurring due to environmental factors such as humidity, which can result in cracking or peeling.
Begin by cleaning the area around the damage, using a damp cloth or sponge to remove dust and loose debris. This will allow the compound to adhere properly.
Next, apply a small amount of spackling compound over the hole or damaged area with a putty knife and smooth it to match the surrounding wall surface. Allow it to dry before applying additional coats as needed. If the surface is extremely rough, a sanding block can be used to smooth the areas. When the spackling compound is dry, use a small amount of a primer to prepare the drywall for painting. This step will help the paint stick and protect the drywall from moisture in humid environments.
Once the primer is dried, sand the patched area with fine-grit sandpaper to produce a smooth, unblemished surface. Always wear a respirator when sanding drywall to avoid breathing in the super-fine gypsum and silica particles that can cause respiratory problems. If you’re not comfortable sanding, consider hiring a professional for stress-free interior house painting services.
Once the sanding is complete, it’s important to test the color and sheen of the paint on an inconspicuous area of the wall. Choosing the right paint is crucial to achieving a flawless repair. Make sure to choose a sheen that matches the existing sheen of the walls, rather than a glossy sheen that will highlight the repair.
Apply the Patching Compound
Drywall, or gypsum board, is a construction material used to create walls and ceilings. It is composed of a core of gypsum, which is then covered with paper and other materials. Because of its durability, drywall is often used in homes and commercial buildings. It is not uncommon for drywall to become damaged. Drywall repair is a simple process that can be completed in a few hours to a day. However, extensive damage may require a professional.
Before beginning a drywall repair project, it is important to make sure the area is clean and free of dust, debris, and loose pieces of drywall. It is also recommended to cover surrounding areas with drop cloths or plastic sheeting to protect flooring and furniture from spackle, sanding dust, and paint.
The first step in repairing drywall is applying a thin coat of spackle or joint compound to the affected area with a putty knife. It is important to follow the manufacturer’s instructions when applying the compound. Once the spackle is dry, it can be sanded down and primed to match the rest of the wall.
For larger holes, a drywall patch can be used to fill the damaged area. These patches are typically made of a gypsum core with an outer layer of paper that is attached to the wall with a metal mesh backing. They are available in a variety of sizes to accommodate any type of hole.
Another option for repairing large holes in drywall is to use a California patch. This technique involves cutting a piece of drywall to fit the hole and feathering the edges for a seamless appearance. This method is also known as a butterfly patch.
Finish with Paint
Drywall repair is an essential aspect of home maintenance, ensuring the structural integrity of your walls and ceilings. Whether you’re addressing cracks, holes, or discoloration, proper drywall repairs can help extend the life of your walls and enhance your living space. Regularly checking for blemishes and taking proactive measures like using dehumidifiers to control humidity, air circulation, and professional drywall touchups can help keep your walls looking newer longer.
The first step in drywall repair is assessing the damage and determining what materials you will need to complete the task. For smaller blemishes like dents or nail holes, you can typically cover these with spackle and paint. For larger holes, you will need to either use self-adhering patch kits or, if the studs are visible, fill the hole with a drywall patch cut to the size of the existing hole and then nail or screw the new piece into place.
Once you have the necessary materials, it’s important to properly prepare the surface for a smooth and even finish. Applying lightweight joint compound and matching the texture of the surrounding wall can help create a seamless and professional-looking repair. Practice applying the compound and texturing on a scrap piece of drywall to get an idea of how it will turn out.
Once the joint compound is fully dry, you can proceed to priming and painting. Using high-quality paint and sanding the patch before painting can help ensure that the surface is smooth and ready for a fresh coat of paint. For best results, apply multiple thin coats of paint to achieve an even color and finish. Afterward, buff the surface with fine sandpaper and apply clear lint-free wax to protect and enhance your work.